
Nail adhesives play an important role in nail art. They aid in the secure and long-lasting attachment of fake nails. Yet, there are instances when the conventional nail glue or tape may not fully cater to one’s needs. So, what can I use instead of nail glue or tape?
Instead of nail glue or tape go for adhesive tabs for a strong hold without the mess of traditional glue. You can also use gel nail stickers for easy application and various designs. These alternatives provide flexibility and cater to various preferences to achieve stunning nail looks without relying on traditional glue or tape.
This blog will discuss different alternatives of glue or tape, how to use them and their pros and cons.

What Can I Use Instead of Nail Glue or Tape
1. Use adhesive tabs

Using adhesive tabs as an alternative to nail glue is a convenient and nail-friendly method for attaching fake nails.
Here’s how to use adhesive tabs :
- Adhesive tabs typically come in various sizes to match different nail shapes. Choose the tabs that best fit your fake nails and trim them if needed.
- Peel the backing off one side of the adhesive tab and place it on your natural nail, ensuring it covers the entire nail surface. Press it down firmly to create a strong bond.
- Continue these steps for each nail, applying adhesive tabs to your natural nails and then attaching the fake nails.
Pros of using adhesive tabs
- They are less likely to damage your natural nails compared to traditional nail glue, as they do not require harsh chemicals or acetone for removal.
- Using adhesive tabs is typically faster than waiting for glue to dry. It’s a great option for those who prefer a quick and mess-free solution.
- Since there’s no drying time involved, you can use your hands immediately after attaching fake nails with adhesive tabs.
- Adhesive tabs allow for easy removal of fake nails. To take them off, gently lift the edge of the fake nail, then peel it away from your natural nail. This process is less likely to cause damage.
Cons of using adhesive tabs
- Adhesive tabs does not provide a long-lasting hold like nail glue. They are best suited for temporary nail enhancements.
- If you have very active hands or frequently expose your nails to water, adhesive tabs may not provide as strong a hold as nail glue, potentially leading to earlier nail detachment.
- Depending on the size and thickness of the tabs, they may be slightly visible at the edges of your fake nails.
- Adhesive tabs may not work well for individuals with extremely curved or uneven natural nails, as they require a smooth surface for optimal adhesion.
2. Acrylic mixture
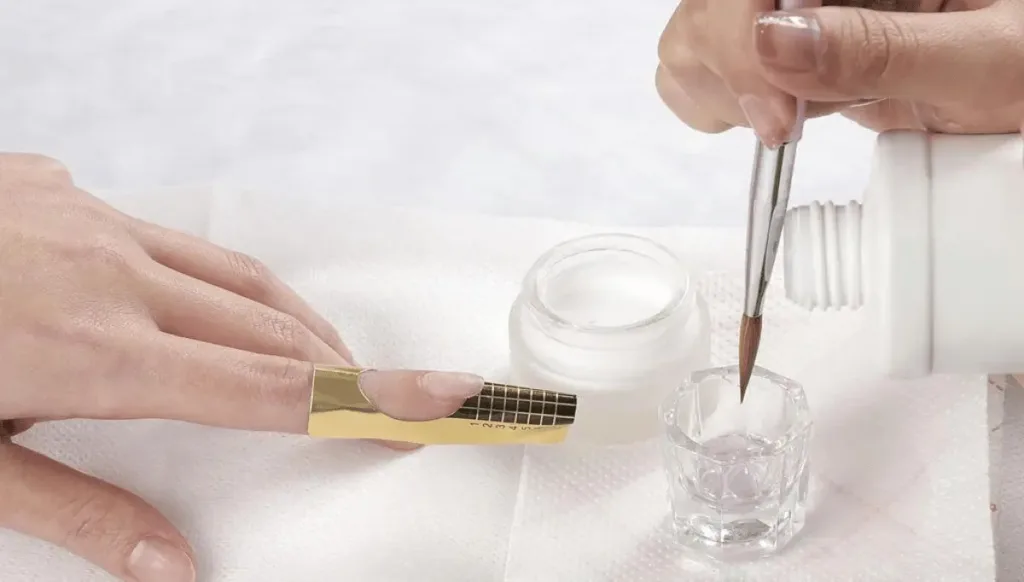
Also, use an acrylic mixture as an alternative to nail glue can be an effective way to attach fake nails while providing durability and strength.
Here’s how to use an acrylic mixture :
- Pour a small amount of acrylic liquid (monomer) into the mixing dish. Dip the nail brush or applicator into the liquid and then tap off any excess liquid.
- After dipping the brush in the liquid, immediately dip it into the acrylic powder. This will create a bead of acrylic mixture on the brush.
- Quickly apply the bead of acrylic mixture onto your natural nail where you want to attach the fake nail. Be precise with your application to avoid excess spillage.
- While the acrylic mixture is still wet, place the fake nail over the area where you applied the acrylic. Press down gently but firmly to ensure a secure bond.
- Continue these steps for each nail, working on one nail at a time to ensure that the acrylic mixture doesn’t dry before attaching the fake nail.
- After attaching all the fake nails, you can use a file or buffer to shape and smooth the acrylic mixture for a polished look.
Pros of using an acrylic mixture
- They can withstand daily activities and are less likely to detach compared to traditional glues.
- You can shape and sculpt the acrylic mixture to create the desired nail shape and length, allowing for personalization and creativity in your nail designs.
- Acrylic mixtures can provide a more natural appearance than some glues, as they can be seamlessly blended with the fake nail for a smooth finish.
Cons of using an acrylic mixture
- Using acrylic mixtures can be tricky and requires practice to achieve a clean and even application. Beginners may find it challenging to master the technique.
- Acrylic liquid (monomer) can have a strong odor, which may be unpleasant for some users. Proper ventilation is essential when using acrylic products.
- Applying acrylic mixtures can take longer compared to other methods like adhesive tabs or nail glue. It requires patience and precision.
- Removing fake nails attached with acrylic mixtures can be more involved than using glue or adhesive tabs. It often requires soaking in acetone or a specific acrylic remover.
3. Go for gel nail stickers

Gel nail stickers are a convenient and mess-free alternative to traditional nail glue for attaching fake nails.
Here’s how to use gel nail stickers:
- Gel nail stickers typically come in pre-cut strips or sheets with adhesive on one side. Choose the stickers that best fit your fake nails in terms of size and shape.
- Carefully peel off the backing from one side of the gel nail sticker to expose the adhesive.
- Align the sticky side of the gel nail sticker with your natural nail, starting from the cuticle area and pressing it down toward the tip of your nail. Ensure that it adheres smoothly without wrinkles or air bubbles.
- If necessary, use nail clippers or scissors to trim any excess sticker material that extends beyond the edge of your natural nail. File the excess sticker using a nail file for a clean, even finish.
- Continue these steps for each nail, applying the gel nail stickers individually.
- After applying each sticker, press it down firmly to ensure a secure bond.
Pros of using gel nail stickers
- Gel nail stickers do not require any drying time, allowing you to use your hands immediately after application.
- They are user-friendly and do not involve the mess or potential fumes associated with nail glue or acrylic mixtures. They are suitable for both beginners and experienced users.
- Applying gel nail stickers is typically faster than waiting for nail glue to dry, making them a convenient option for on-the-go nail enhancements.
- Gel nail stickers can be easily removed without the need for harsh acetone or nail polish removers. You can gently peel them off, minimizing the risk of nail damage.
Cons of using gel nail stickers
- Gel nail stickers may not provide as strong a hold as nail glue or acrylic mixtures, making them best suited for short-term or temporary nail enhancements.
- Gel nail stickers come in pre-designed patterns and colors, which may limit your ability to create highly customized nail designs.
- Depending on the thickness and fit of the stickers, they may be slightly visible at the edges of your fake nails, which can be a cosmetic concern for some users.
- May Not Be Ideal for Active Lifestyles
4. Gel polish

You can also try gel polish in place of nail glue to attach fake nails is an alternative method that provides a strong and durable bond.
Here’s how to use gel polish:
- Choose the fake nails that best fit each of your natural nails in terms of size and shape.
- While not always necessary, you can apply a thin layer of clear or opaque gel polish as a base coat on your natural nails. Cure it under a UV or LED lamp according to the manufacturer’s instructions.
- If you prefer a colored or designed look, apply a layer of gel polish to the underside (the part that will be attached to your natural nail) of each fake nail. Ensure the gel polish is applied evenly and covers the entire underside of the fake nail.
- While the gel polish on the fake nails is still wet, press each fake nail onto the corresponding natural nail, aligning it with the cuticle area. Apply gentle pressure to ensure a secure bond.
- Cure the attached fake nails under a UV or LED lamp according to the gel polish manufacturer’s instructions. This process typically takes a few minutes and ensures the gel polish hardens and provides a strong bond.
- After curing, you can use a file or buffer to shape and smooth the edges of the fake nails for a polished look.
Pros of using gel polish
- Gel polish provides a robust and long-lasting bond, making it ideal for extended wear.
- Gel polish comes in a wide range of colors and designs, allowing you to create a customized nail look.
- Gel polish creates a smooth and natural-looking finish, making it suitable for those who want a polished appearance.
- To remove fake nails attached with gel polish, soak them in acetone for a brief period, making them easier to take off without damaging your natural nails.
Cons of using gel polish
- Applying gel polish and curing it properly requires some skill and may take practice to master.
- You will need a UV or LED lamp to cure the gel polish, which can be an additional investment.
- The application and curing process with gel polish may take longer compared to some other attachment methods.
- Removing fake nails attached with gel polish involves soaking in acetone, which can take some time and may require additional effort.
Conclusion
From adhesive tabs for hassle-free application to DIY acrylic mixtures and stylish gel nail stickers, there are numerous substitutes to suit every need and preference. Natural homemade solutions provide quick fixes, while press-on nails offer built-in adhesive convenience.
By exploring these alternatives, nail enthusiasts have the freedom to experiment, express their unique style, and enjoy beautiful, long-lasting artificial nails without relying solely on conventional adhesives.